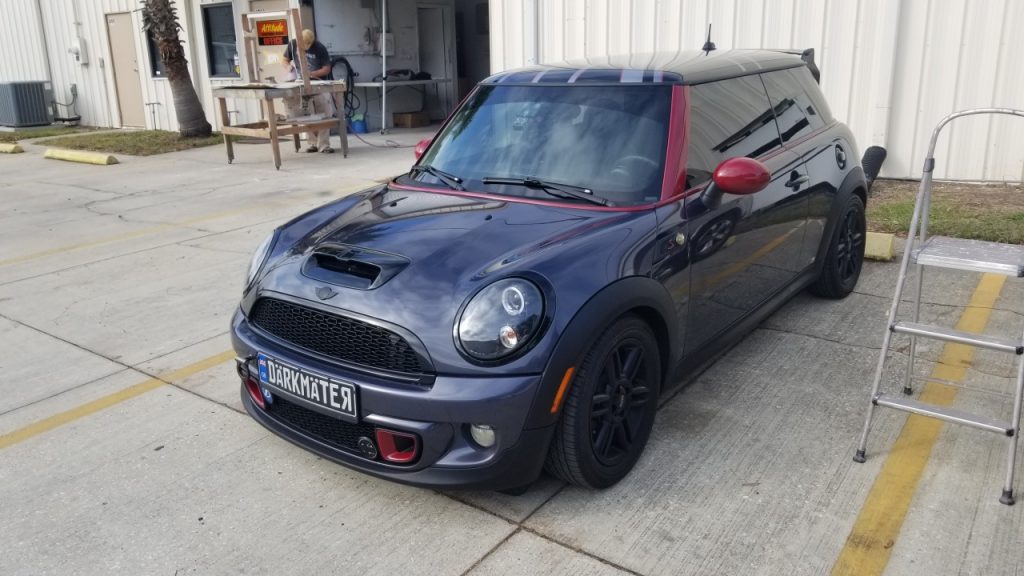
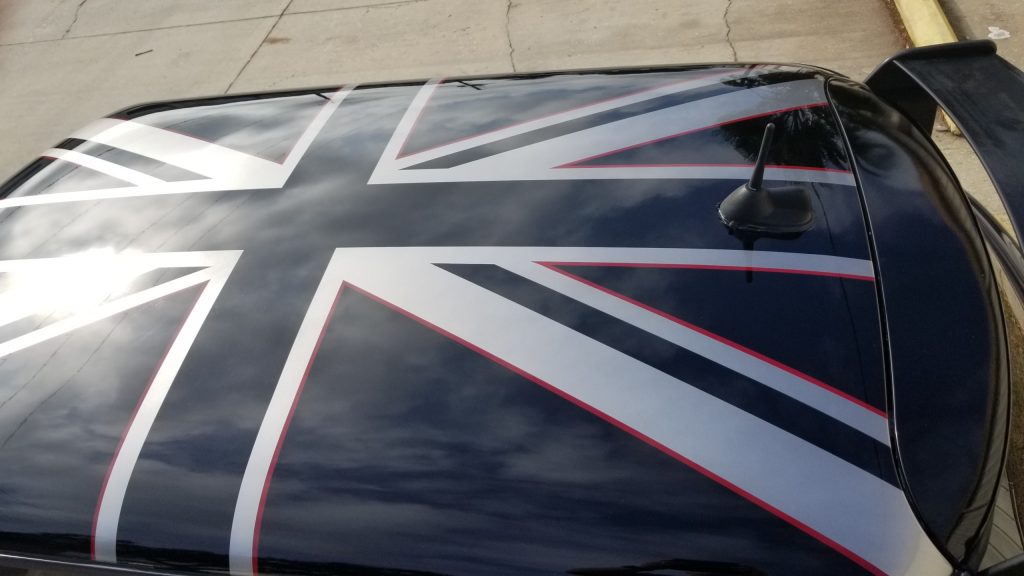
This image How-To consists of painting a Union Jack flag on a Mini Cooper S. From start to finish. From prep, to layout, to painting the pinstripe first, to painting the design along with clearcoating. I also included a video at the end.
See some other How-To’s (these are 7+ years old, but still may be helpful to other painters)
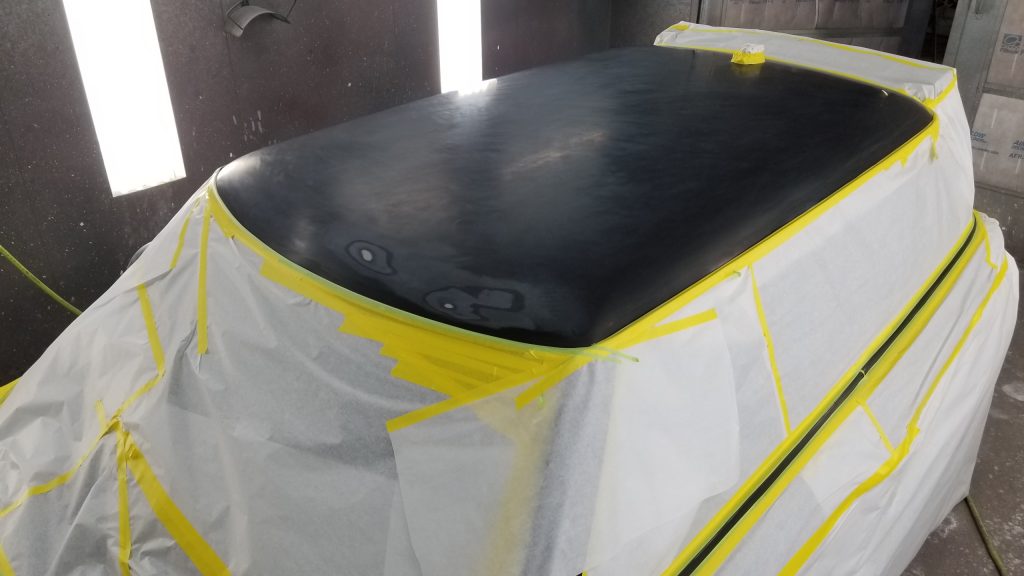
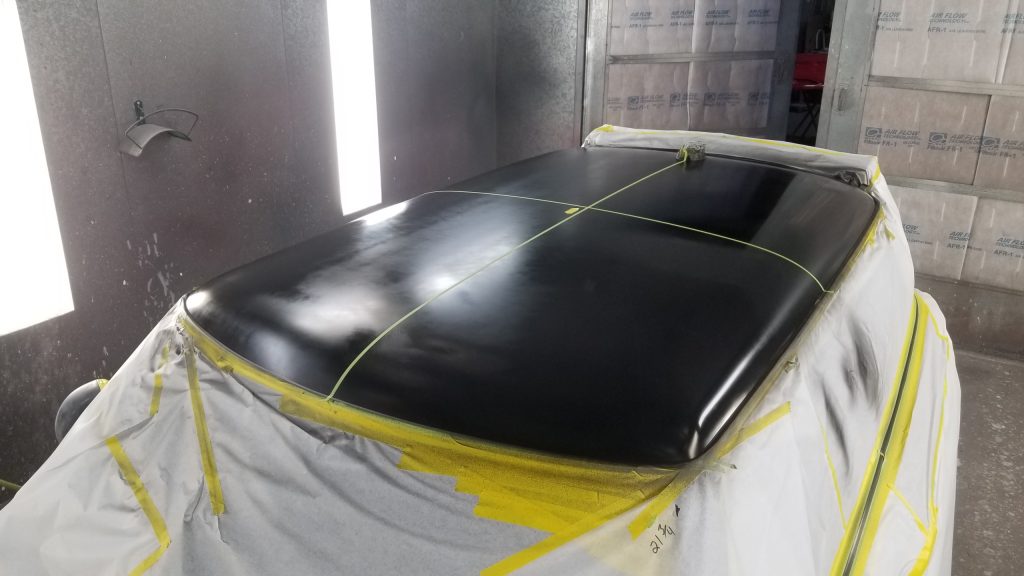
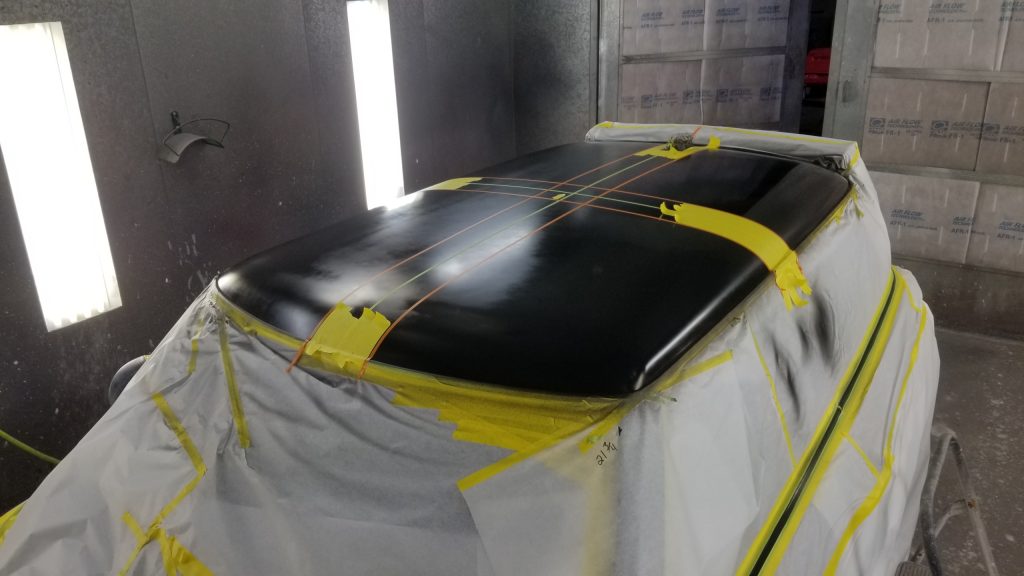
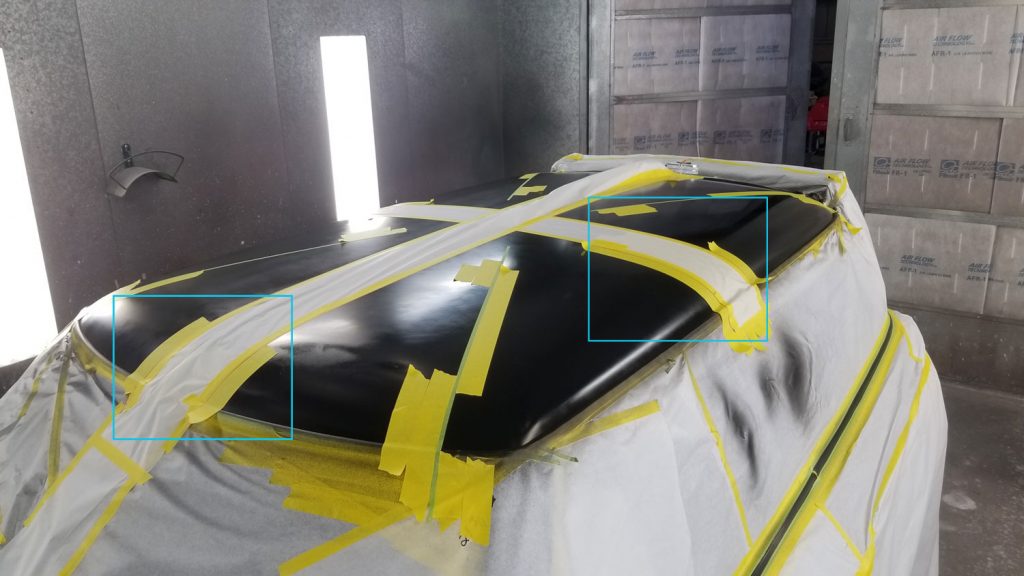
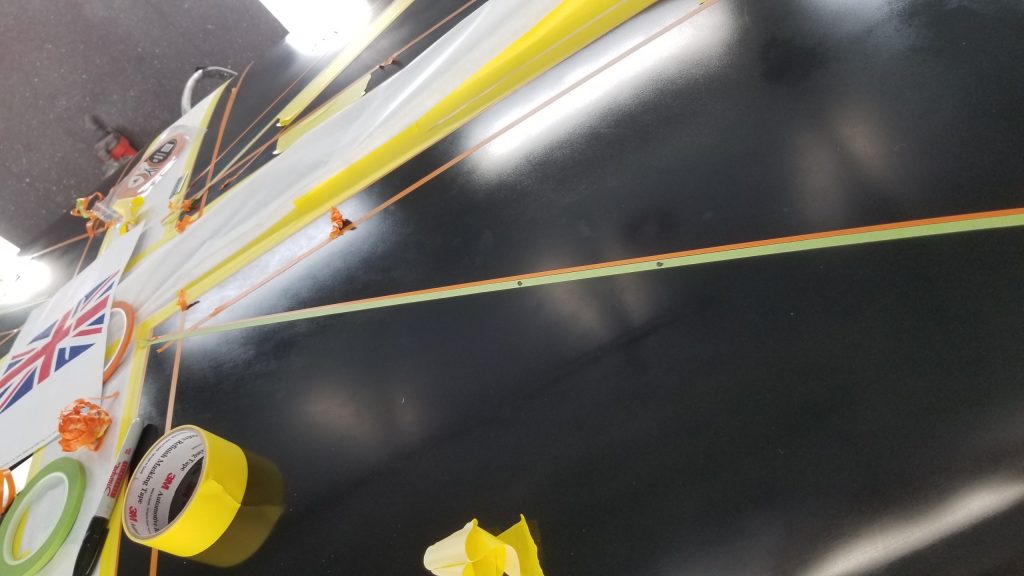
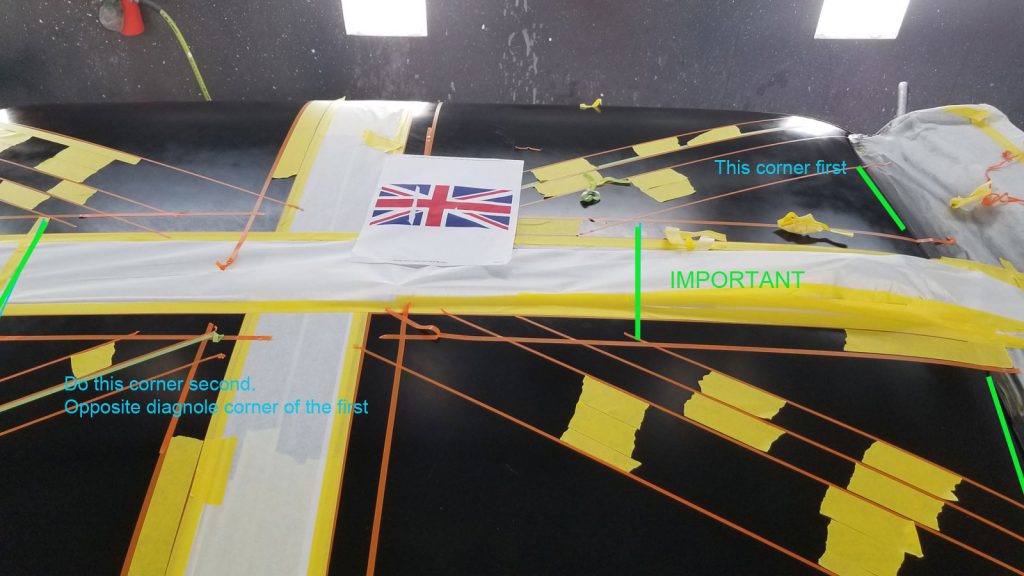
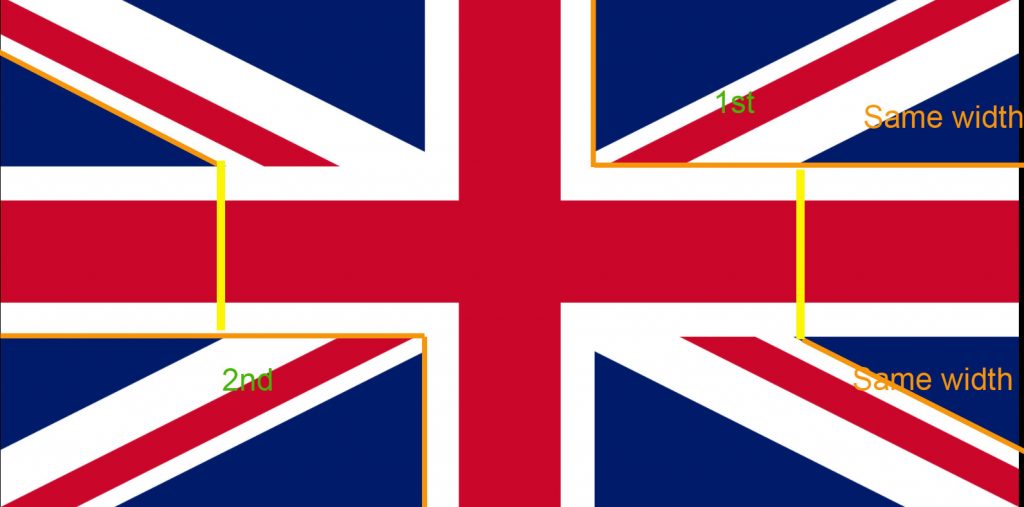
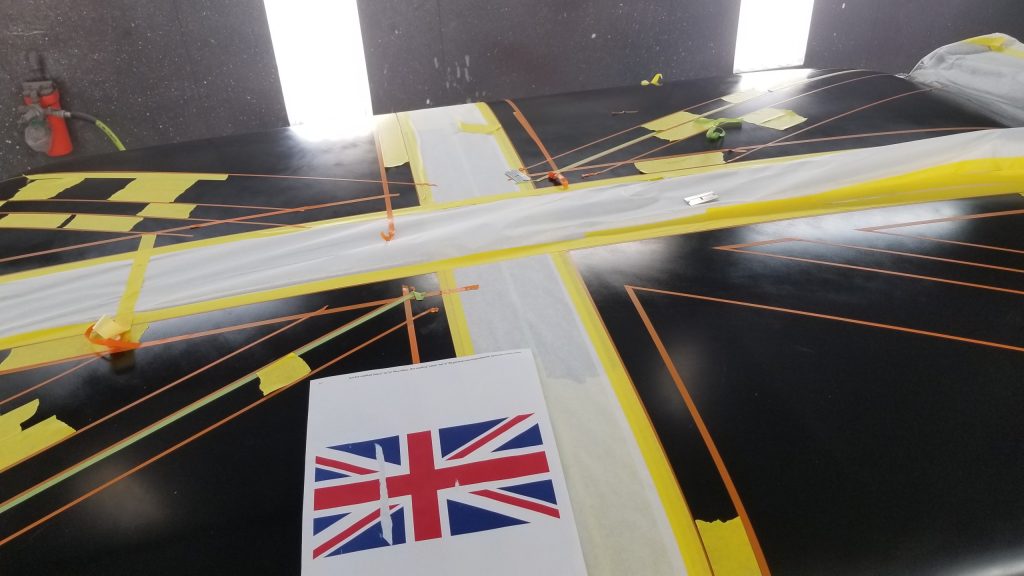
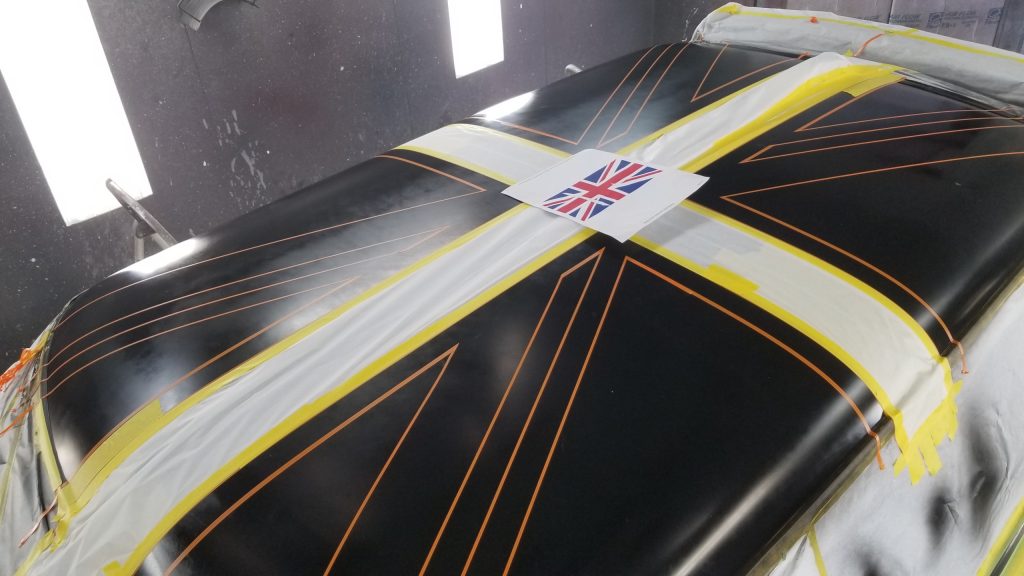
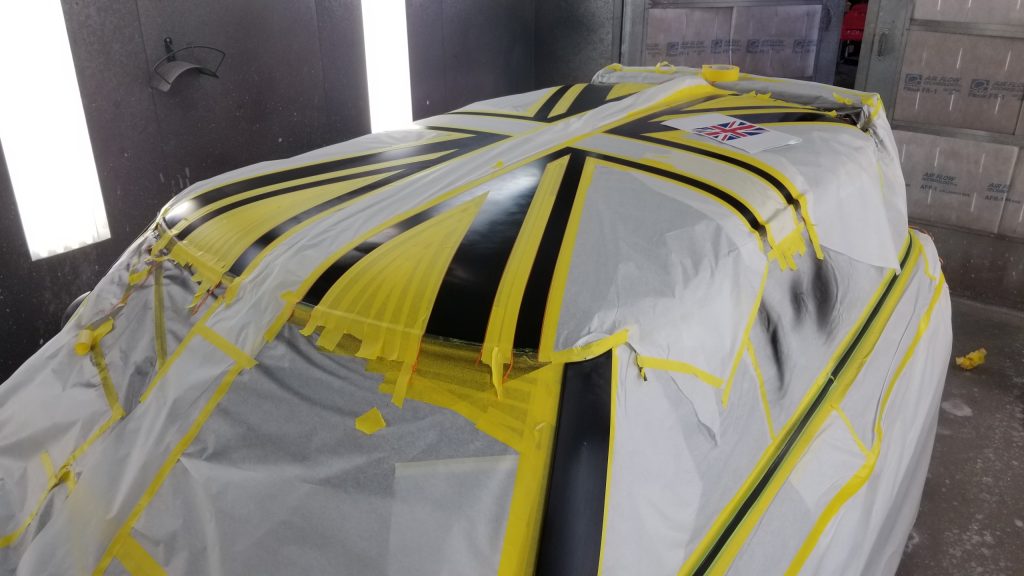
We prepped the roof using 600 grit DA. Then we wetsanded with 1000. We masked it up so we can paint the A pillar moldings and the belt moldings toward the end of the paint job.First things first. We need to find the center of the roof. Then you’ll want to mark this by using some green masking tape. Here I have it laid out using 1/4″ masking tape. You’ll want to avoid using ‘fineline’ anytime you are using tape as a “guide” since the masking tape is quite a bit cheaper than the fineline.What I did here was use 4 pieces of 1 1/2″ 3M tape as a guide. I put 2 pieces on each side of the 1/4″. I put the 2 center pieces right down the middle of the 1/4″ NOT next to each side. So the total of four 2 1/2″ pieces makes it 6″ wide. If I put it next to the 1/4″ on either side, of course the total would be 6 1/4″ I used these four pieces as a guide to lay some 1/4″ fineline next to it. You can see how I did this in the above image.Next, I masked up the 2 main stripes.One thing you have to watch for is the tape pulling, This will leave a gap where you can get ‘blow-through’ I help eliminate this by putting a slice in the tape, Then I push it down real goodThen I will at an extra piece of tape in which I make sure this gets pushed down as wellNow you’ll want to butt up 1 1/2″ tape on each side of the + This will be a guide to lay your next stripes. It’s a good idea to lay some on each end and closer to the center as well. This way you have a guide to use from the start to the endRun 1/4″ fineline next to the 1 1/2″ guides. I’ve already removed the guide on the lower corner. You can see it on a couple of the corners toward the center. This ensures that this area will be 1 1/2″ wide You’ll see toward the end of this How-To that 1/4″ of this area will be a red stripe for the edging. IMPORTANT as I did not do this the first time around. Run the tape all the way until they meet on all 4 areas.. You can see I did do this on the left bottom corner area.Now on opposite corners. Run a piece from the corner of the INSIDE lines to the corner of where you want the center of your graphic to endFrom here on out, I used 1/8″ fineline Ignore the lower right for now. Pay attention to the upper right. This is where it really starts getting confusing. So bare with me lol. In the upper right hand and the lower left hand corners, you will see the 1/4″ guide masking tape that goes from the corner down the corner of the roof. On one side of the tape where the smaller side of the corner stripes will go, I placed a 1 1/2″ pieces of tape. Then I put another one on the other side of it. I put the fineline up against that. Then I placed two 1 1/2″ tape, PLUS one more 3/4″ (now you can look at the lower right) Do the same in the OPPOSITE DIAGNOL corner (noted in teal lettering) So now you should have 2 corners done. You have 2 more to do. DO NOT use the 1/4″ green tape down the center method. You will need to do the other 2 corners differently. Pay attention to the triangles to do this. See pic below
IMPORTANT – Now do the other 2 corners by making the exact same triangle noted by the IMPORTANT green lines. You’ll want to make the triangles the same. You can do this by running a piece of masking tape directly across to the other side. Once you have this noted, you can run your piece of 1/8″ fineline down to the edge of the roof. You’ll want the width of the spacing to be exactly the same on the the sides. See the green lines on the end of the roof. Spacing is the same. The triangle starts directly across from the other. Now once you have that 1/8″ line down, work your way backwards using 1 1/2″ masking tape as guides
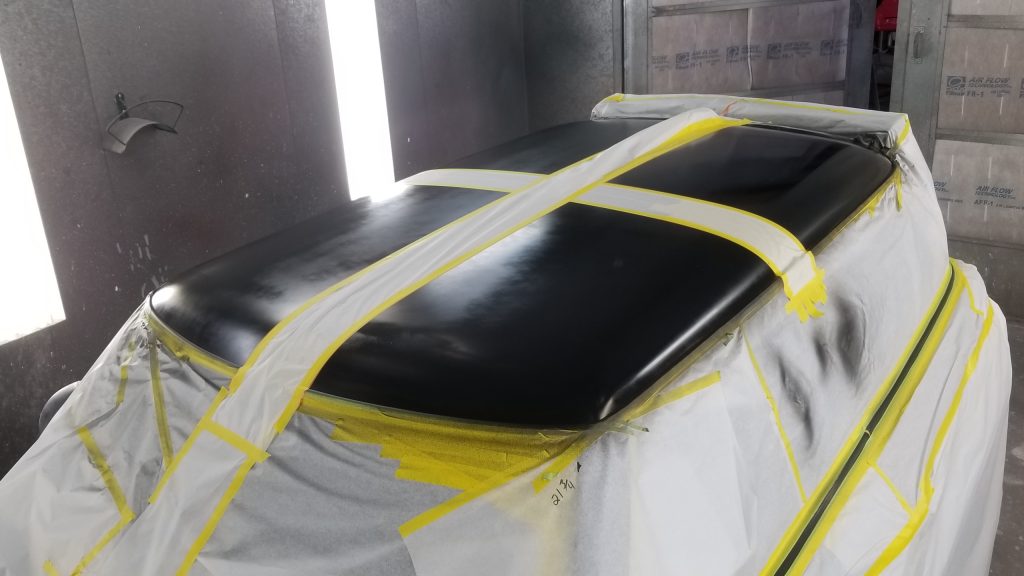
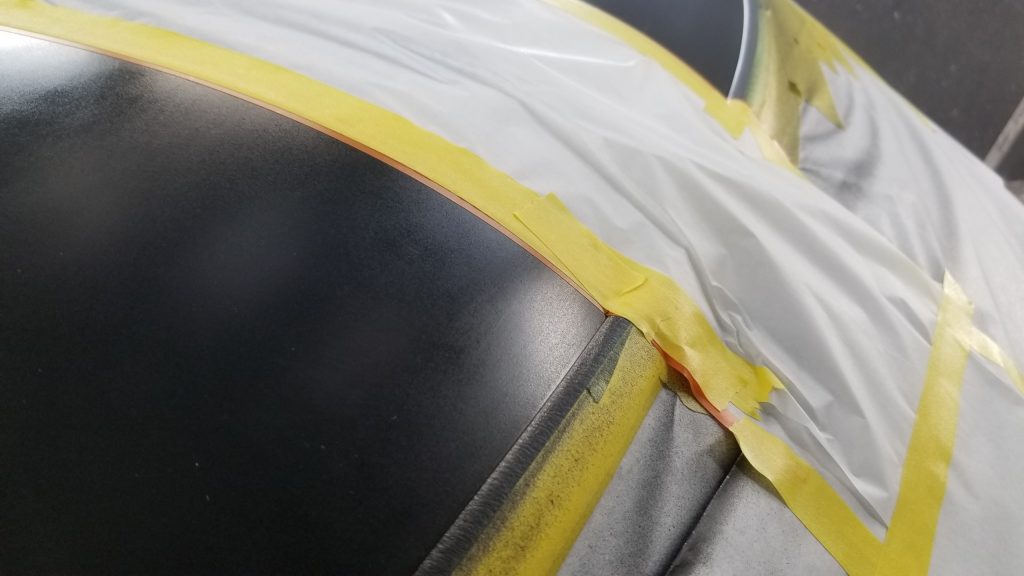
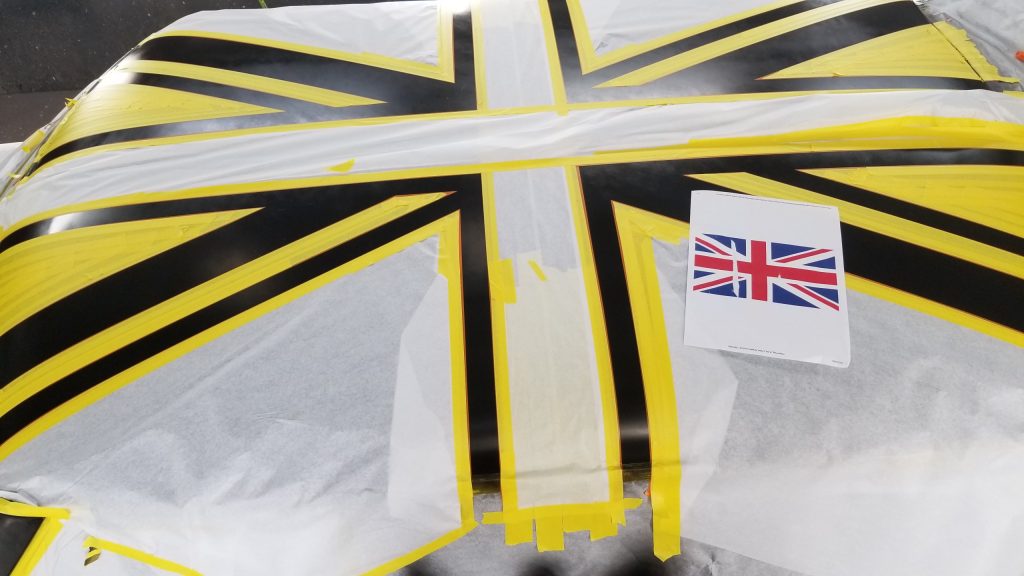
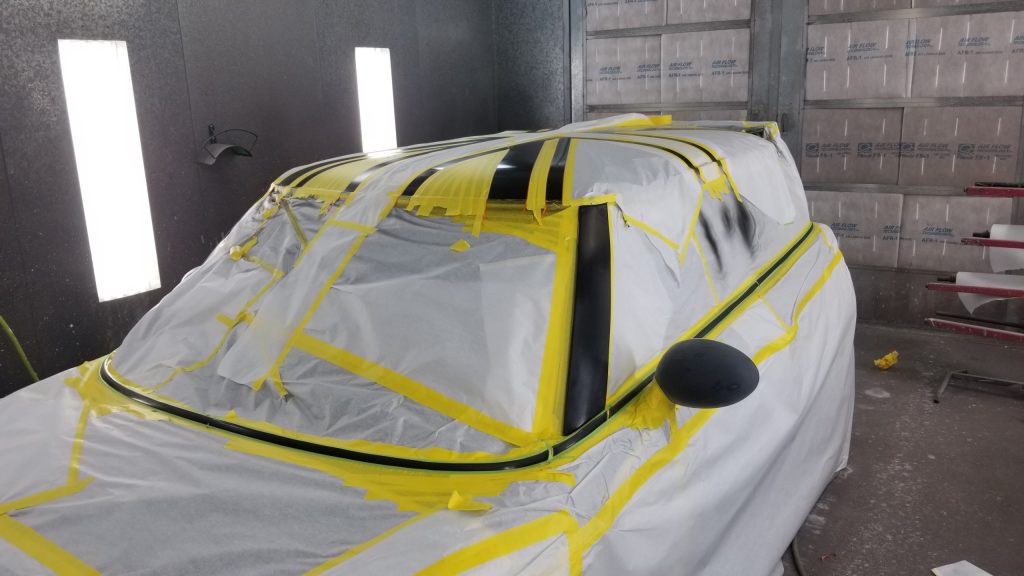
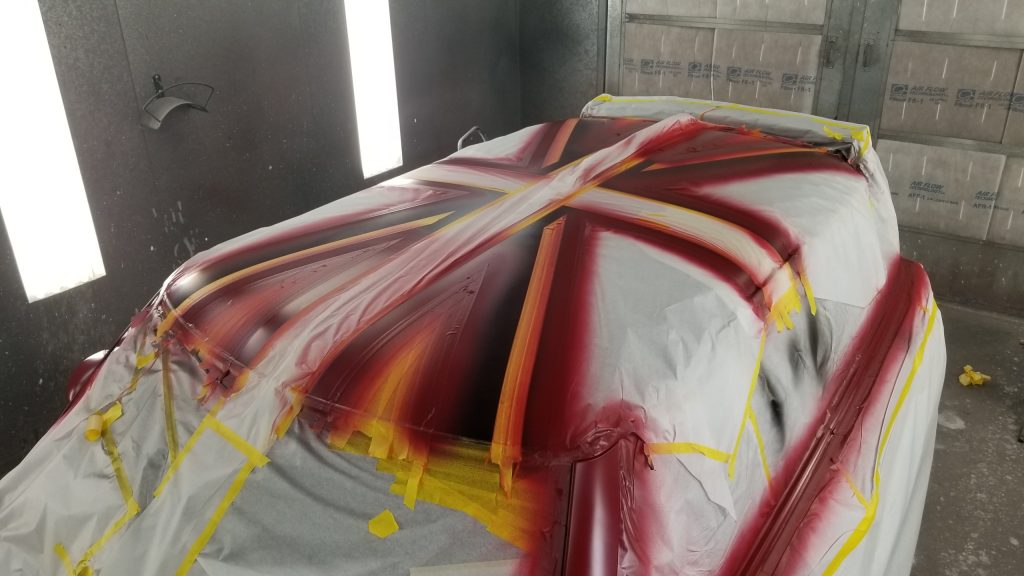
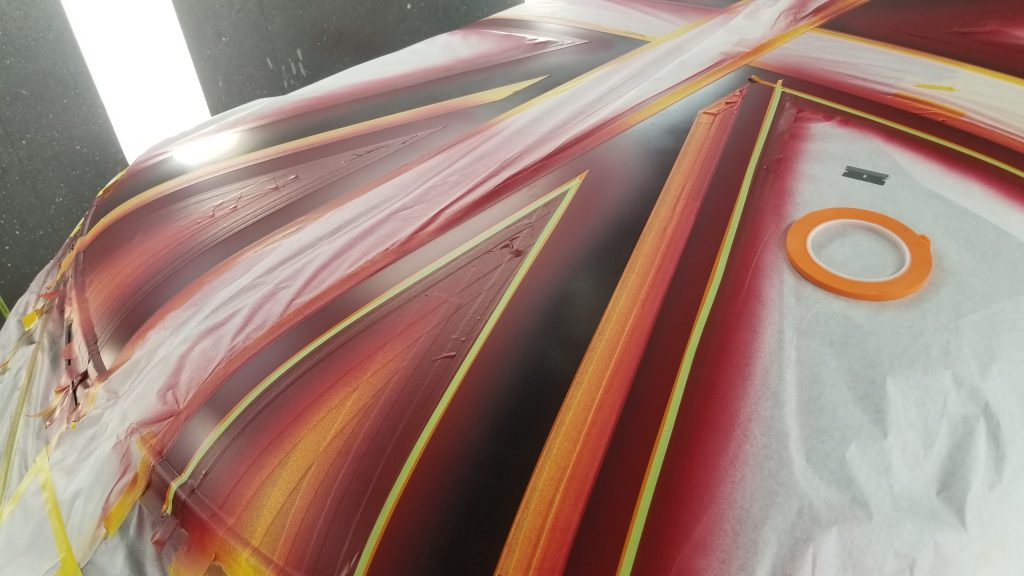
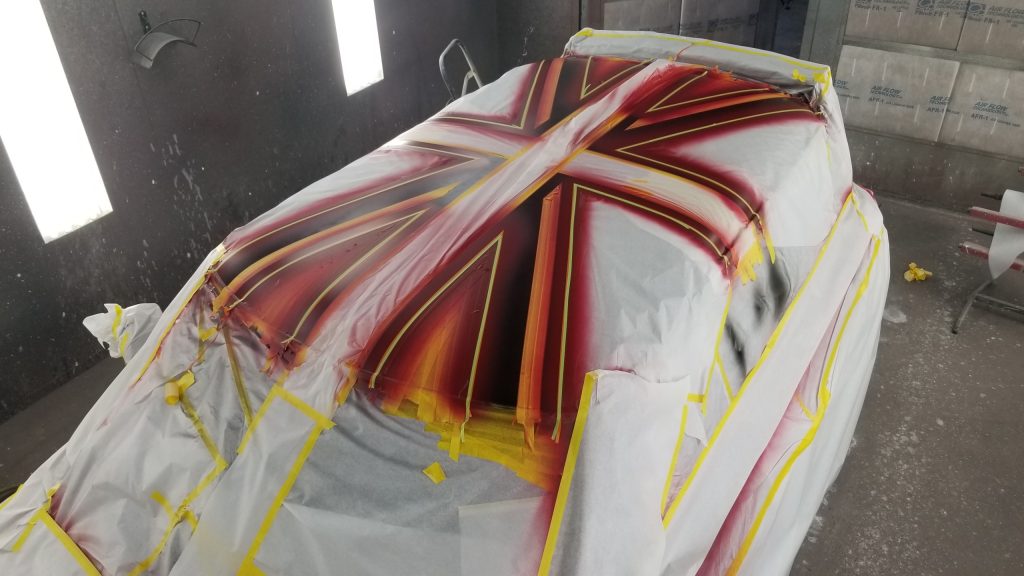
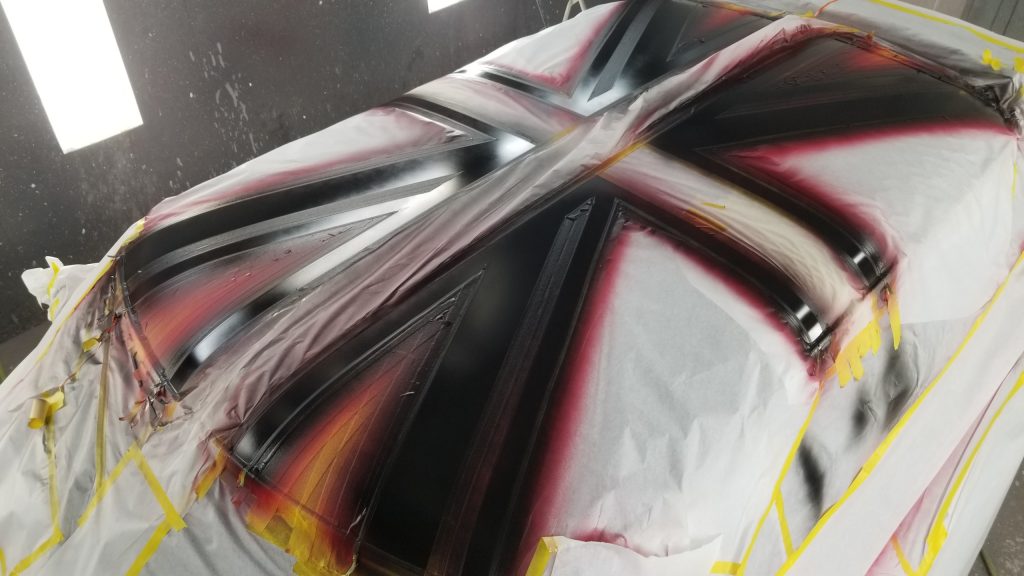
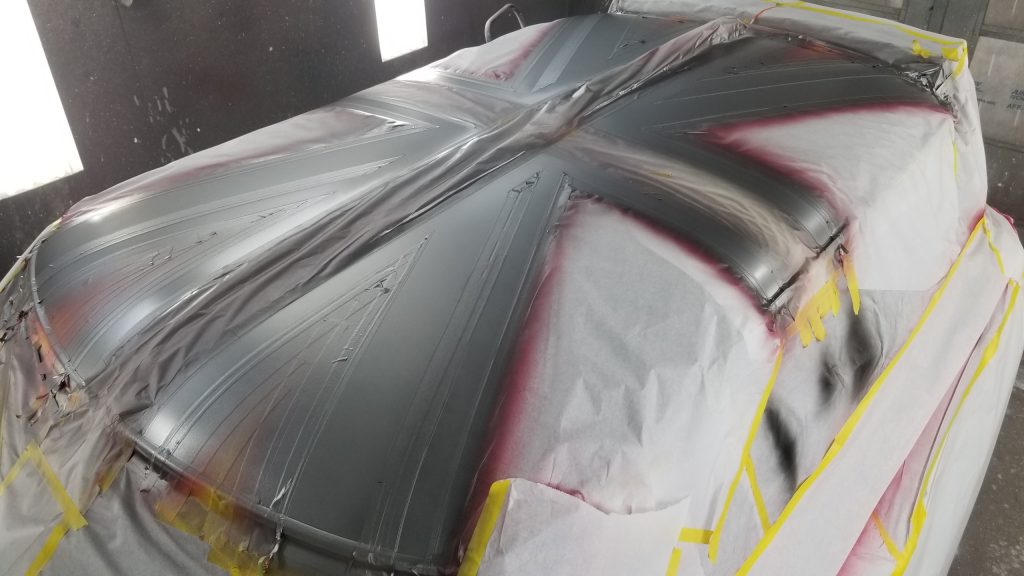
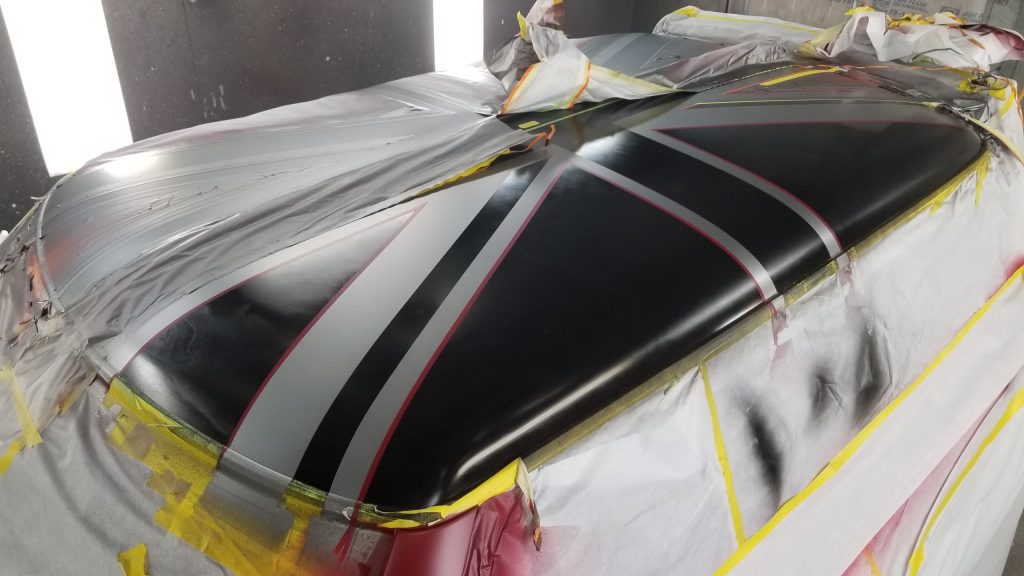
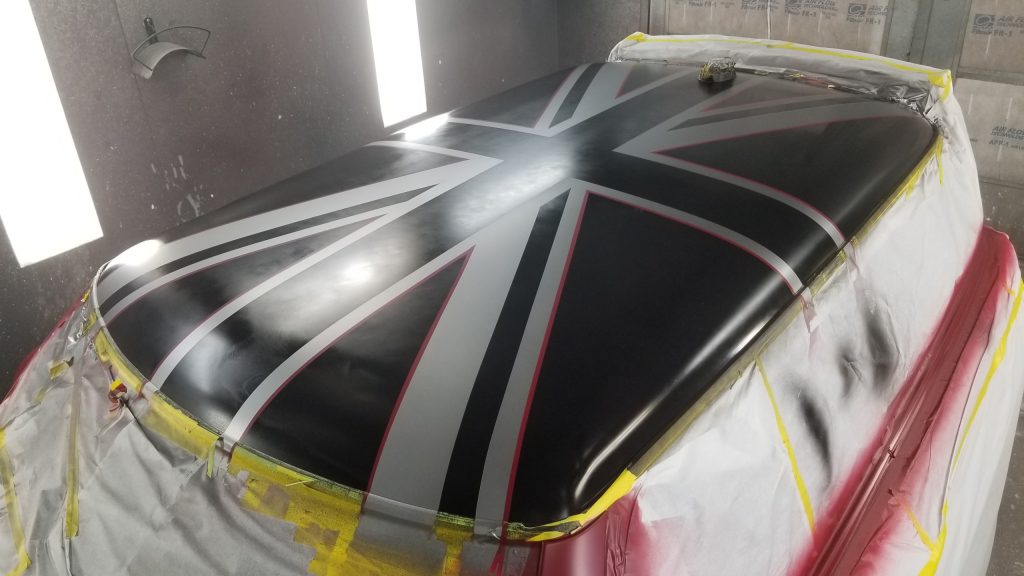
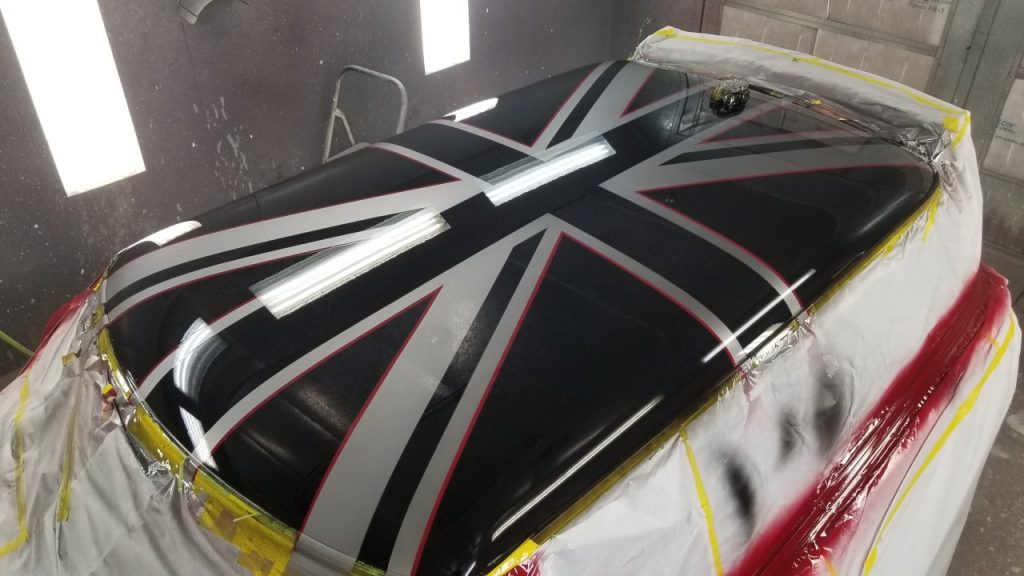
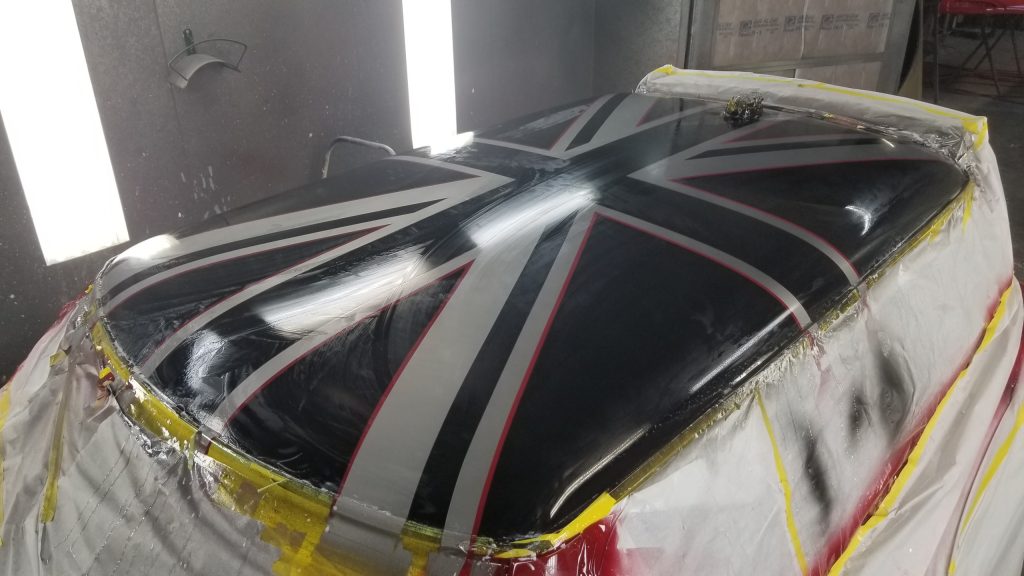
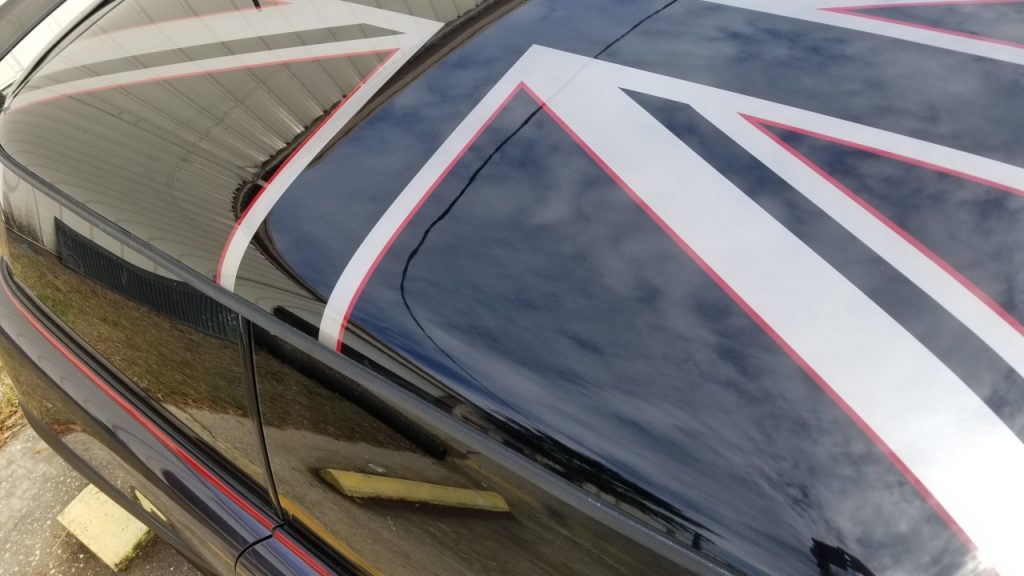
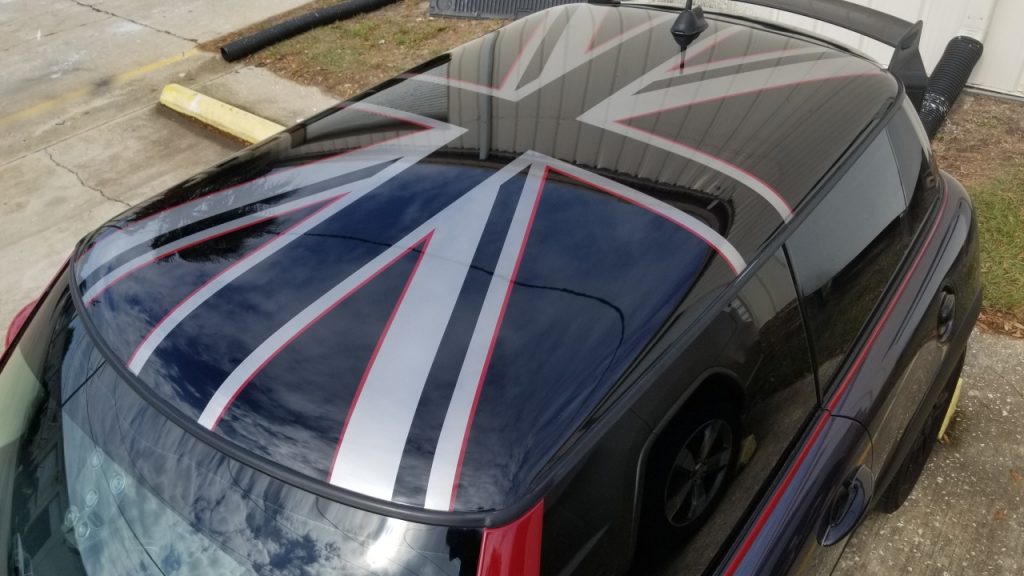
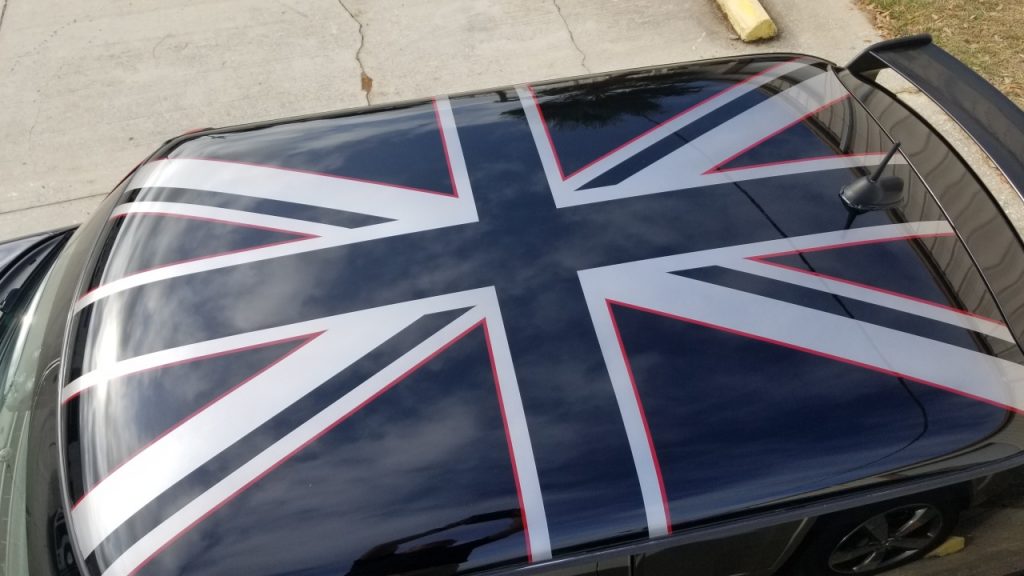
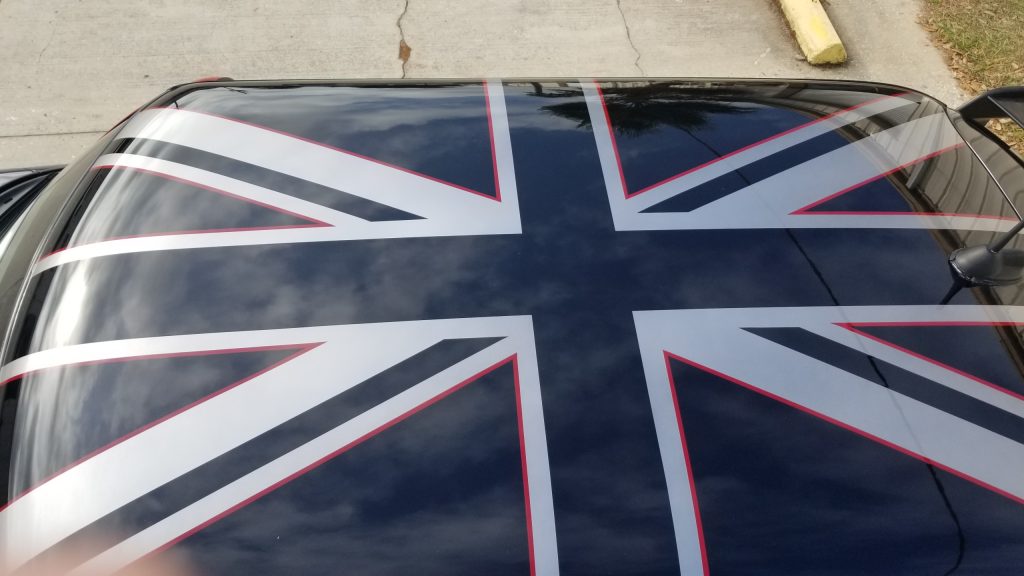
You can also use the image below as a reference The two yellow lines are 3/4″ tape that you use to help make the angles the same as the other side. Start those at the same place as the other side and make sure that the width is the same at the end of the roof and those angles should be the same. Union Jack FlagHere you can see where I used the yellow 3/4″ tape (the tape going across the white masking paper) to make sure that’s the same place I started the angle on the upper left.Now it’s time to CAREFULLY cut the corners. You’ll want to use a new blade whether you are using a razor blade or an exacto knife.Once you get all the corners cut, you’ll need to mask all areas up except the areas that get painted. Note the printout that I used as a reference. Not to scale since we wanted to make sure the flag design looks good on the roofAnother pic of the area all masked up. I am also painting the belt moldings along with the pillar trim and a couple bumper ducts.Ready to do the red pinstriped edge FIRST. Doing the stripe color first makes it a LOT easier to do since you don’t have to guess at the width of a 1/4″ stripe. You are using the 1/4″ tape to make it for you by covering the area you want to leave as the edge. For those who haven’t seen my YouTube channel, I have a video that shows how to do a pinstripe backwards. You can see that here https://youtu.be/Tk1vlmi12JwHere you can see where I sprayed some red around the edges where the actual stripe will go. You don’t have to do the complete area, just the area where the stripe will be. You definitely have to make sure that you ‘overpaint’ the area versus underpainting.You can see how to do the edging. I used 1/4″ fineline to do this. You’ll butt this up against the edge of the stripe. You’ll want to take your time and do a good job as if you leave a gap, then this area will become wider than 1/4″ once done. The green masking 1/4″ runs over where the orange tape and the previous orange tape butt up against eachother. If you do not do this step, any hairline gaps will leave blow-through. This is just an ‘insurance’ step. Cover that gap!!!!The 1/4″ fineline edging tape is all done along with the 1/4″ masking insurance tapeHere I sprayed black to ‘kill’ the red. This ensures that it will take less of the main color to be sprayed in the next step. It will make it easier to cover the black versus the red overspray areas.The charcoal basecoat is sprayed!Starting to untape the area. You can see how that 1/4″ fineline used for the red edging worked out. Here is is all unmasked. It all worked out excellent!!!This is how it looks like after clearcoating. The customer wants the gray to have a matte finish. So we’ll buff the roof. Then we’ll mask off the gray areas again, scuff them. Then we’ll spray a couple coats of clearcoat with flatting agent.Here I have it all wetsanded. 1500 wetsand. Once it’s dry, we’ll buff and polish the roof.We got it all buffed. It came out great. Due to the colder weather, the fact that I used a High Solids clear along with the humidity we had, I opted not to spray the matte clear over the gray. I started doing the outline but it was leaving a print. Prints on this roof with a gloss and matte finish would be a disaster as there is no chance of buffing them out if needed. So I told the customer if he still wanted the gray stripes matte clearcoated, he can bring it back in a couple weeks. This way, we know for sure the paint will be cured.
See our section with both new and used parts including fenders, tanks, stretched baggers kits, used emblems along with RARE Harley-Davidson Items See the section here
Outstanding quality repair & paint job on my Harley-Davidson gas tank, repaint on my front fender & inner fairing. Looks just like brand new factory paint!
Scott is a master craftsman! He delivered beyond measure in matching the paint and style in the spirit of my 105th Anniversary Harley Heritage Softail. I highly recommend him and would use him again in a... heartbeat.read more
I am absolutely THRILLED with my "new" car. Scott did an AMAZING paint job on my old Camry, it looks brandy NEW and even cleared the headlamp covers so they sparkle! AND, he did it in just a few days!!!! not... weeks like some of those others. PLEASE BRING YOUR BUSINESS TO AN INDEPENDENT BUSINESS OWNER, you will NOT be disappointed in Scott's work! This is a husband/wife business operating for over 20 years!!! KUDOS and Blessings to them :-)read more
This is Roberto and I am using my wife's email address.My 2008 Honda Civic is the Love of my life and my wife knows that. I am very particular about who works on my car and I scoured the Internet for the... best. It took me a long time to look for someone to paint my car. I chose Attitude Custom Painting because of Scott and Jody's top notch Customer Care. When I brought my car to their shop, Scott was Professional he advised to what is only required to be done to my car. I was impressed that he actually gave me a hard copy of estimate and no surprise hidden costs. The price is reasonable. Before I made my final decision, I called the shop numerous times because I've tons of concerns/questions. Understandably, my car is getting a major work done. When I call, Jody always picks up the phone. She was Professional and very patient with me. If Scott was not available at the moment, he will call back in a timely manner.Now, about the Paint job, all I can say is WOW! WOW! WOW!. Look no further and don't waste your time anywhere else because Attitude is the Place for the best Car Paint Job. It doesn't matter to him if you're driving an inexpensive or very expensive car, he will treat it with great care and attention.The flawless workmanship and quality are unmatchable. He truly is a Perfectionist. He even cleaned my headlights as complimentary. Thank you Scott and Jody for making my Girl looking like Brand New!read more
I brought my 2014 Corvette in for a minor spot job to repair scratches that were too deep to just buff out. Scott was very accommodating as I dropped it off a little early, no problem. He started on it early... and had it done for me the next day. He did a perfect job matching and blending it just as if it was factory. Jody also stayed in touch with me to let me know what was going on with the job. I highly recommend their work and will be doing business with them again in the near future for my Classic car. Thanks again for knocking it out so quick and getting it done on short notice!read more
This business is absolutely amazing. Scott and Jody were so accommodating and completely thorough with all of our needs. Scott went above and beyond and turned our truck into an absolute beauty. We are above... satisfied and would definitely utilize this business again. Highly recommend Attitude Custom Painting Inc...read more
As much as I hate to leave a review like this, I feel it’s necessary given my experience. I brought my GMC Yukon XL in to Scott, due to the factory paint being completely faded on the roof, and the hood was... full of scratches and swirls. I also had minor damage to the right side of bumper from the previous owner. I paid a lot of money for this vehicle and plan to keep it forever. With that being said, I wanted to invest in a new paint job. This company had awesome reviews and were super friendly and easy to work with when getting a quote and getting scheduled in for service. Scott and Jody seem like great, hard working people, which makes this review so much harder. I opted to upgrade to the high grade paint job Scott offers. When I picked my vehicle up it was gloomy and rainy. It looked good from what I could tell. A day later when the sun was shining I could see swirls everywhere. I also noticed solvent pop(patches of tiny bubbles) in multiple areas on the left side of the vehicle. I called Scott and he told me to bring it back and we scheduled a date and time to bring it back in. I felt it was nice that he would resolve the issue. In between that time I did wash my car as I was told it was okay to wash but to baby it since paint was still curing. When I washed it, a patch of clear coat literally started peeling off. So I brought it back and show all this to Scott, he tells me he will give me a call when truck is ready. He worked on it all day, wet sanded and buffed it I think. He repaired the clear coat peeling, and my truck looked nice and shiny. He even offered to pay $100 toward my first wax, which he did. However, here we are over a month later and I still have solvent pop in multiple places. There is also orange peel I was told will go away when paint cures. Hopefully it will, but it’s been over a month. While Scott’s prices are reasonable, and they are friendly, I’m not happy with my paint job. I feel I spent a lot of money and wanted a great job, hence why I upgraded to high end paint, and chose a shop with great reputation and reviews. I’m not hopeful in the longevity of the paint and hate feeling the way I do about the money I invested in it. At this point I’m going to live with it. Maybe this was a one time thing and it just happened to be my car.***RESPONSE to owner***I have no complaints about the hood as it’s honestly beautiful. The areas where there are bubbles, you did wet sand however they are still there. Orange peel is not minimal Scott. Also, thank you for correcting me on the side of the vehicle. There’s bubble spots all along that side of the vehicle. The video you took looks stunning. It looks clean and shiny. I’ll attach the photos of the up close blemishes. After I had my truck cleaned and waxed I took a look at the roof of the truck and that’s a whole other story. I thought when I originally brought it in prior to being painted that you stated you’d have to strip down the roof and hood due to the awful condition it was in. It is what it is, but if it was your own personal vehicle you wouldn’t feel satisfied with it. Good day.read more
Scott and Jody were amazing to work with! Beautiful work done on my GMC and I couldn’t be happier. Super reasonable and friendly service with GREAT quality work. Thank you so much Scott!!
I own a very expensive, high end, custom, twin turbo 2010 Camaro that is my pride and joy. I did all of the drivetrain custom work as well as the custom interior. I decided to install a ZL1 front clip and... wanted a custom paint job that would reflect a particular "look" I had envisioned in my mind. I also had a couple dings in the roof and driver door that needed to be repaired.A customer of mine told me to try Attitude Custom Painting for a reliable and professional painting service specializing in custom work, so I did. I took the car over to his shop and we talked about what I wanted. After seeing some of his awesome work, I was immediately sold on having him do my Camaro, so we scheduled the project.He did it on time and when he returned the car to me, I was stunned at the workmanship and quality of everything he did. The project turned out fantastic and to perfection! I highly recommend him to anyone needing custom painting and want it done right and on time. The guy is a genius at what he does! I'm very hard to please but he exceeded my expectations.I have since had him do more custom painting on my interior trim pieces that required very precise pinstriping and he always meets the challenge and expectations. Scott and his wife, Jody, are awesome people and are honest and have the highest integrity. Hard to find these days. They get my highest possible rating!!!!!read more
I have a black Hyundai Elantra and I wanted a lime green fade from front to back...so the front is lime green and it fades to the black...the pearlized lime green is BEAUTIFUL!!!...Scott NAILED IT!!! ITS... BETTER THEN I COULD OF IMAGINED!! I get compliments all the time!! People stop and stare at my car!! I am 120% SATISFIED And I would recommend Attitude Custom Painting to ANYONE that wants their car painted!! Price was good, he got it done when promised, no added BS fees like alot of places try to do! HE'S HONEST, I LIKE THAT!! The office manager ( I think his wife) was VERY SWEET and professional!!read more
I used Attitude Custom Painting to repaint my truck and do some minor body work and I'm very happy with the results. The price was fair and right in line with what other shops quoted me. Scott finished the... job in about 3 and a half days when other shops said it could take up to two weeks. The quality of the work appears to be excellent, and I like that they include photos of the job in progress so you can see that they didn't cut corners. Anytime I called they picked up immediately and were always friendly. You couldn't ask for better service.I highly recommend this business.read more
Scott repaired some motorcycle parts for me and matched the paint (3 stage big blue pearl) perfectly. If you are looking for quality service and reasonable prices this is the place!
Really glad I decided to get my motorcycle painted here! Scott was super professional, friendly and timely with his responses. The quality of work done by him and his team is amazing! I’m impressed with how... well they made my idea come to life and she is sparkling! Would 100% recommend anyone to come get their paint jobs done hereread more
Scott, Jody and staff are the best! I've had several cars painted and repaired there with excellent results! Thank you so much for your attention to detail and making sure the job is done right!
I love this custom paint shop they redone my gas tank for my 99 Yamaha V Star color match was perfect Jodi and Scott were excellent to work with I'm going to be doing future work with them on my vintage... Corvetteread more
I had Scott completely repaint my 1983 Jeep Scrambler. The quality of work is excellent. The price he quoted was very competitive and he did not hit me up for unexpected extras. We did make a couple of minor... changes during the process and he was more than fair on the charges. Was very timely in getting the work done and kept me up to date on status (with pictures). I would definitely use him again and recommendread more
I appreciated the opportunity and service. The shop helped me out. And I also enjoyed the shop settings. really professional and straight forward on anything 😉. Thanks
Had my wife's 2018 H-D Softail Street Bob custom painted. The paint job turned out flawless and looks incredible. Pricing is very reasonable for a custom paint job. Scott and Jody at Attitude Custom Painting... are awesome to work with. They are very responsive and professional. Would definitely do business with again without hesitation.read more
Top notch operation. First off, they always answer the phone and take the time to walk you through the work being done. Want an update? Give them a call and someone will tell you exactly what step in the... process is being done. I took a very curvaceous Ducati tank in with a fist size crash dent. They took the tank same day and gave a very reasonable 5 day estimate and got it done in that time . Scott repaired the dent and resprayed the tank for me. The paint shines better than new. Bonus: they’re actually nice and personable unlike the grease monkeys I usually deal with.read more
After researching top notch painters in the Tampa Bay area, I chose to use Attitude Custom Painting. I met with Scott and his wife Jody and explained exactly what I was wanting him to do for me. I brought him... all my Harley Davidson Street Glide custom parts after meeting with them. My fiancé and I explained how important it was to us that this paint job needed to be perfect. When the work was completed, in a timely manner, Scott had us come to the shop to inspect and pick up all parts. I have to say we were absolutely ecstatic with the custom paint job! Scott knocked it out of the ball park and exceeded our expectations. We can’t thank you enough Scott and Jody for your professionalism and fantastic customer service. I highly recommend Attitude Custom Painting for the paint job you may be wanting.Thank you,Bart and Daniread more
Brought my 2009 Jeep Wrangler to Attitude after getting hood replaced tohave complete vehicle painted.The rest of body had pits in paint as well as rust around door edges, Scott made the whole vehicle come... to life with a better than new car showroom finish(chose Midgrade paint package).There is a amazing attention to detail that provides exceptional value (applied lacquer to running boards and mirrors).You will get your money's worth and be pleased using Scott & Attitude.read more
Had my Accord repainted here a few years back. They did an absolutely phenomenal job. I hate having others do work on my cars or my house. I am very critical of the work I do and hate paying to have others... to make mistakes. They were the rare case of perfection. My car had a better paint job when they were done than when it was new! Oh, and get this... Their price was very reasonable! Now I have been playing with the idea of changing the color on my Honda S2000. Wouldn't go anywhere else. 10 stars, if that is even possible...read more


Comments