


This removal ‘How-To’ should work for all Softails, Dynas and, and Dressers.
Keep in mind, that some of the steps will vary, but for the most part, they are basically the same.
These are the basic steps to remove a EFI tank without making a mess and spilling fuel all over the place.
Installation Step by Step Here
Please note. The below how-to was written back in approx 2007, so this may or may not be useful to you. The newer Softail Tanks are slightly different on the inside. So be sure and use these are ‘basic’ tips.
| Tools/Items Required
—A good clean area on a bench. Have an area about 4′ wide ready. Put a clean towel on the bench and one you can use to drape over the bars if you plan on hanging the dash over the bars
|
»If you have access to a motorcycle lift, this will help you tremendously. This way, the bike is in the upright position.
If you do not, you can do this while the bike is on the floor. It’s also a good idea to have a buddy help you removing the tank.
The below steps are assuming that your fenders and seat are already removed
»Undo the fuel line on the quick release located on the left rear bottom of the tank.
Remove the dash, leather strap (if applicable) and anything else in the way of the pump. Remove the front and rear mounting bolt(s) for the tank. If you have a vacuum line attached to the top of the tank, also remove this. Remove the fuel cap.
Tip: In most cases, when you remove the dash, you can ‘carefully’ swing it over the bars and you can leave it hanging there. You can lay a towel on your bars to ensure you do not scratch anything. you may want to even tape the dash to make sure it does not fall back off.
»Remove the pump plate (I believe there are 8-10 screws). Watch for the little plastic spacers when removing these screws.
»Start to lift the plate/pump out of the tank (only about 2″. Just up enough to access the rear pump hose). Remove the hose from the back of the pump (this hose is the one that runs to the quick release connector on the left bottom rear of the tank). Use your small screwdriver and stick it in the portion of the clamp that sticks up from the hose. Once you get the screwdriver inserted, wiggle it back and forth to spread the clamp open. Once you get the clamp loose, remove the hose from the pump. Be careful not to poke a hole in the hose when you are loosening the clamp. If you carefully insert your small screwdriver in the very end of the hose, this will loosen it up enough that you can pull it off by hand
»NOW you can use your wrench to unloosen the quick release connector on the lower left of your tank. Just LOOSEN until fuel starts coming out (the more you loosen the connector, obviously the faster the fuel comes out) . Be sure and have a funnel and a large bucket to hold all the fuel ready when you loosen the connector. Drain it as much fuel as you can from this connector. If your bike is secure, once the fuel stops coming out, you can shake the tank to get a little more fuel out. Now hand tighten the connector to keep any more fuel from coming out (you MAY have to use your wrench to do so).
The above 2 steps are important ones as you cannot remove the quick release fitting from the tank until you get the other end off the fuel pump. If you just turn the quick release without doing the above, the hose will bind and break. So this is a good idea to get these out of the way first.
»Go up to the front crossover line. Have about a 3′ piece of hose ready to attach (same diameter as the stock crossover line. I believe 5/16″) ready, along with a 3/8″ bolt. Remove the clamp on the left side the same way you did the ‘pump’ hose. Once the clamp is loose, remove the hose and quickly cover your finger on the crossover fuel line and push on one end of the 3′ piece fuel over the open tank fitting. Be sure and have the other end of the 3′ piece leading into the fuel can. Get as much fuel as you can out of this fitting. Keep your finger over the open end of the crossover line. You have to do this very quickly to avoid a mess. Your buddy can help you out on doing one of the above procedures while you do the other.
»While the fitting is draining, stick the bolt into the end of the open end of the crossover line. This will prevent it from leaking (so be sure the bolt is big enough to plug your crossover line). When you go as much of fuel as you can out of the left, remove the 3′ fuel line and add one of the vacuum plugs
»Go to the right side of the bike. Loosen the right tank fitting clamp and remove the right side of the crossover line, then quickly put on your 3′ line. Once this is drained, remove the line and add your vacuum plug. The tank should have 95%+ of the fuel out of it.
So now you have about 95%+ of the fuel out of the tank, the front fittings are plugged and you still have the quick release slightly tightened on the left rear of the tank.
»Slowly lift up the tank. Undo the gauge connector that is on the left lower side of the tank (It’s best to have someone help you with this step). Then you can completely remove the tank from the bike. Be sure to not hit the bars when removing the tank.
Tip: If your bike is sitting on the ground (not on a lift), you may want to temporarily move the bars to the straight position (if you can do so). This will give you more clearance on the left side when removing the tank.
The tank is now off the bike…»Put the tank on your bench topside up. You can now finish remove the pump from the tank.
If the ‘float’ is attached to the fuel pump bracket (most pre 2006 Softails and others), you will need a long screwdriver to ‘unlock‘ the spring loaded arm. Stick the screwdriver into the tank and carefully push against the ‘arm’. This will unlock the bracket. Then you can lay the pump flat and slowly bring it out of the tank. Some of the tanks do not require you to unlock the arm. You’ll know if you cannot bring the pump and sending unit out.Tip: You may want to use a flashlight to take a good look at what at how the arm unlocks. Basically this is spring loaded, so when you push down on it, it releases, then you can ‘flatten’ the arm with the rest of the unit.
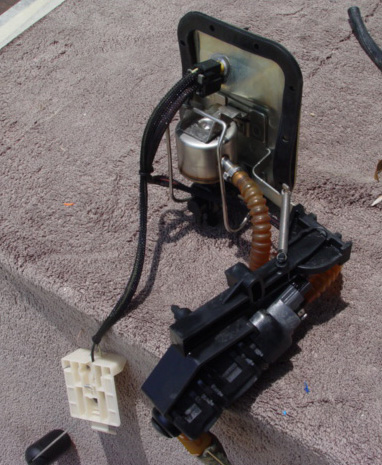
This is the way is sits in the tank. Notice the sending unit is separate from the rest of the pump assy.
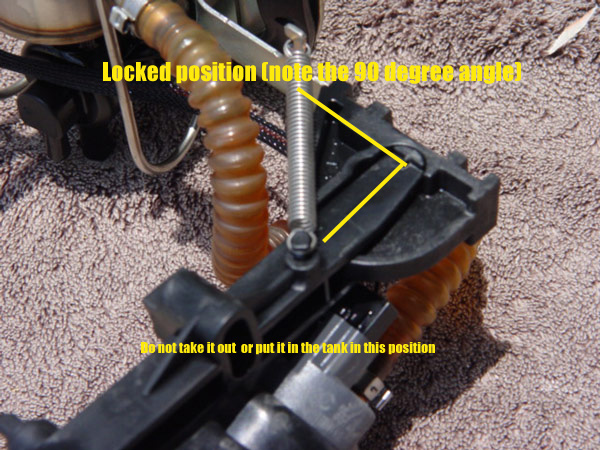
This is a spring loaded mechanism in which you need to push on the black tab (see below pic)
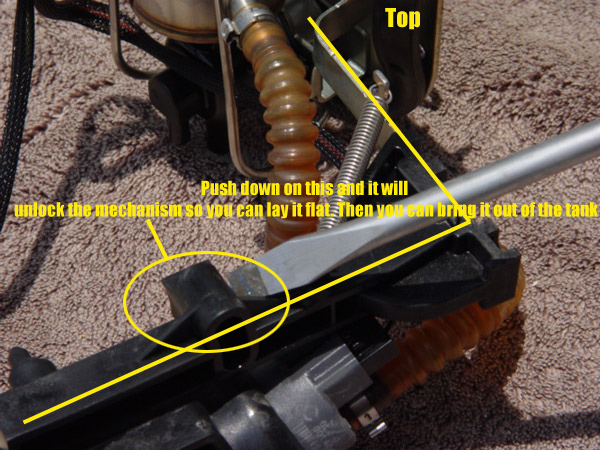
Pushing on this tab will unlock the mechanism, this making it so you can lay the assy flat and bring it out of the tank
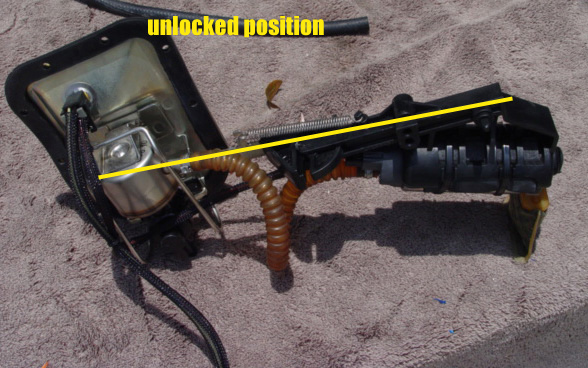
You will need to make sure it’s laying in the flat position to also put it back into the tank.
These pics are for the 2006 and 2007 only.
2000-2005, the sending unit was attached to the pump assy, so you can use the same basic steps as above.
2008 – ? it’s even easier getting the pump unit and the sending unit out.
»Once you have the pump out, take the tank outside and empty any remaining fuel out. Be sure and remove the vacuum fittings that you used to plug the crossover line fittings, and the quick release fitting at this time (the quick release fitting should be just hand tightened). You may have to stick your hand inside the tank and turn the hose at the same time you are turning the connector.
You will need to leave the ‘ribbed’ hose attached to the quick disconnect fitting. You will reinstall this as a whole.
NOTE: When you remove the fuel pump, the pump itself will contain fuel. Be careful not to spill it all over you!
Wipe off the outside of the tank (and inside best as possible) and bring back inside to your bench.
If your towel is soaked with fuel, it would be a good idea to change it now or at least use the other side if you double it up.
»Put the tank upside down on the bench. Now you can start removing the gauge. Using your awl, open the little trap door on the connect (this just snaps into the open and close position). Once the trap door is open, look inside the other end of the fitting. This is the end that has the pins coming out of it and used to connect to the other side of the harness.
You will note that you have either 2 or 3 wires coming out of the connector.
You will see right above the pins there is a VERY small open hole. You will need to stick your awl in this hole to un connect the pin. It’s a good idea to have a buddy help you do this. Have them slight pull on the wire while you are undoing the pin.
Do all wires in the connector like this. This could be time consuming, so you have to have patience for this! Once you do the first wire, the other one(s) will be a little bit easier (maybe?!).
Your tank will probably have a little wire ‘hold down’ tab attached to the bottom. You can remove this at this time. This is just held on with double sided tape. You can just use a small flathead screwdriver to remove this.
You will be reinstalling on your custom painted tank.
Tip: Before removing the pins from the connector, you may want to add a little piece of tape on the connector showing the wire/color locations (i.e. Y – O – | – B). You can use this as a reference when you go to put the wires back in.
»Once the connector is off, turn the tank sideways and slowly remove your gauge while keeping an eye on the wires. I usually try to stager the wires while I pull the gauge out.
»Okay, your tank should be ‘gutted’ now. Let it air out until you can’t smell any fumes.
Make sure everything else is off. Some tanks will have the little ‘hold down’ tabs for the leather strap between your seat and the dash. Dressers will have one that holds the vacuum line down under the dash. Remove these and don’t discard.
»Set the tank aside to air out. Once it’s aired out, you are ready to ship
Disclaimer: I’m by no means a certified H-D mechanic. I did the ‘How-To’ based on the knowledge I’ve achieved by removing and installing at least 50+ tanks on H-D’s. I have also built a custom bike from the frame up, along with a few trucks.
Remember that fuel is involved in the above procedure. Safety and common sense must be used in all the above steps.
Please use the above ‘How-To’ at your own risk.
created 6/3/07
Scott Farrell
Attitude Custom Painting
attitudecustompainting.com
727-527-8275
Tools, equipment, paint and more.
Auto Body Store


More
Comments